
How to change the default RDP port in windows
In windows, operating system default RDP port is 3389 (Formerly known as terminal services).
if you use a remote desktop for connecting a Windows computer, you can able to change the default port of RDP.
If you set port 65535 for RDP, then it is more secure and not easy to guess for hackers!
Most of the people use the default port for RDP (3389). it's easy to guess by a hacker.
if you change the default port of RDP in that case no one to able identified that port.
The information applies to all versions of the Windows operating systems.
Windows Clients
Windows 2000
Windows XP
Windows Vista
Windows 7
Windows 8
Windows 8.1
Windows 10
Windows Servers
Windows Server 2000
Windows Server 2003
Windows Server 2008
Windows Server 2012
Windows Server 2016
Windows Server 2019
How to Change the Default Port
You can change the default RDP port can be changed by modifying the registry using the following steps. before that changes take backup of the registry file.
Click on Windows key + R and Regedit press enter

Take backup of the registry file

Expand the registry key
HKEY_LOCAL_MACHINE\SYSTEM\CurrentControlSet\Control\Terminal Server\WinStations\RDP-Tcp and select Port number

Double click on PortNumber

Select Decimal

Change default port to another that is not in use. here I use 55558 port now click on OK

Now RDP port changed. Restart your computer.

There is one more thing change if your computer has Windows firewall enabled. you need to create a rule in the firewall to allow new port that we are changed in the Windows firewall. if you have firewall disabled then no need to create a firewall rule.
Click on windows key +R for Run

Type Firewall.cpl and press enter

When windows firewall screen appears click on Advance settings

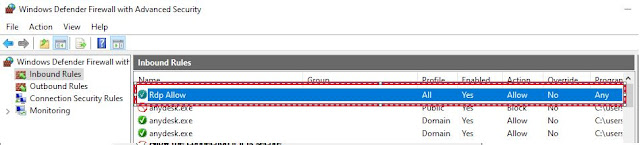
When a screen appears (Windows defender firewall with advanced Security on local computer) Click on inbound Rules.

Right-click on Inbound Rules and select new rule

Click on Port and Next

Select TCP and type port (Which port you are change in registry e.g:55558) and click on Next

Select Allow the connections and click on Next

Click Next so the rule applies to Domain, Private and Public profiles

Type here Rule name and click on finish

Now rule successfully Created in the windows firewall
Now click on windows key +R and type mstsc press enter

Type the computer’s IP address or the domain name, followed by the custom RDP port number, e.g.55558
If you were to use an IP address, you will still enter the port number at the end, e.g. Computer name:55558

Computer Port 0 to 1023 are called well-known ports, port numbers 1024 through 49151 are registered ports. You can choose port numbers from between 49152 and 65535.

Select Decimal

Change default port to another that is not in use. here I use 55558 port now click on OK

Now RDP port changed. Restart your computer.

There is one more thing change if your computer has Windows firewall enabled. you need to create a rule in the firewall to allow new port that we are changed in the Windows firewall. if you have firewall disabled then no need to create a firewall rule.
Click on windows key +R for Run

Type Firewall.cpl and press enter

When windows firewall screen appears click on Advance settings

When a screen appears (Windows defender firewall with advanced Security on local computer) Click on inbound Rules.

Right-click on Inbound Rules and select new rule

Click on Port and Next

Select TCP and type port (Which port you are change in registry e.g:55558) and click on Next

Select Allow the connections and click on Next

Click Next so the rule applies to Domain, Private and Public profiles

Type here Rule name and click on finish

Now rule successfully Created in the windows firewall

Now click on windows key +R and type mstsc press enter

Type the computer’s IP address or the domain name, followed by the custom RDP port number, e.g.55558
If you were to use an IP address, you will still enter the port number at the end, e.g. Computer name:55558

Computer Port 0 to 1023 are called well-known ports, port numbers 1024 through 49151 are registered ports. You can choose port numbers from between 49152 and 65535.


0 Comments