
Virtual Memory Windows 10
Step 1
Raise Task Manager > More details item to make it look like this.

See that column named Disk? If that reads 100%, you currently know why your PC is unfortunately slow. Ideally, the remaining steps will fix your computer, so this column reads a much smaller number. If it does not read 100%, you don’t need to do anything, however, you can continue with this reset if you wish to.
Step 2
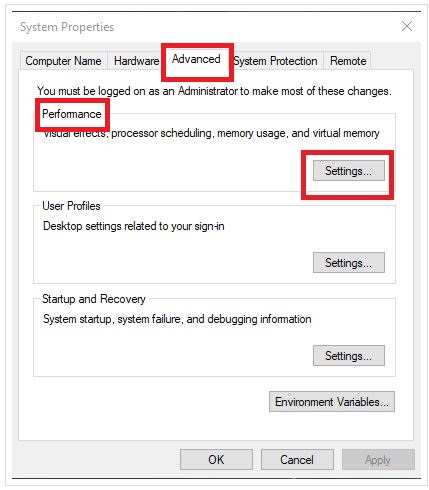
Click Windows search box type View Advanced System Settings. You can see here the identified application. Click on it.
Step 3
In the window area marked Performance, click on the Settings… button. Presently, you should see a window like this one.
Step 4
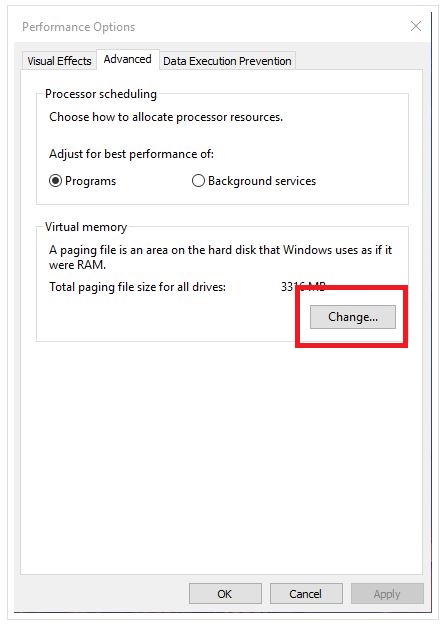
In the Performance Options window, click on the Advanced tab.

This is the place the great beginnings. The area named Virtual Memory gives you the amount of your hard disk drive (or solid-state drive) is being utilized by Windows as though it was a memory on your computer. If your computer is not running well, and your Disk column in Task Manager said 100%, resetting this Virtual Memory should help.
Step 5
In the Virtual Memory area, click on the Change… button. This will spring up another window.
Step 6
Change the Virtual Memory settings by unchecking the Automatically manage paging file size for all drives checkbox, and by clicking on the No paging file radio button. It should look like this.

Step 7
Click on the Set button. You will see this alert pop up.
Click on Yes. Now, click on the OK button in the Virtual Memory window, then restart your computer.

At this point, you have removed the virtual memory from the windows. Your computer WILL run slower. It will take longer to do anything, and everything. Don’t worry. We’re not leaving Windows this way. We’re going to reset virtual memory.

Step 8
After you are back in Windows, bring up the View Advanced System Settings window again. If you forgot how to see Step 2 above. As before, bring up the Virtual Memory settings (see Step 3 and Step 4). You should be back at this window.
Step 9
Check the Automatically manage paging file size for all drives checkbox. And click on the OK button at the bottom of the window. Now, restart your computer one more time.

Step 10
Repeat Step 1 of this procedure. The Disk column should gradually drop to a much smaller number, and your computer should run better.
For those interested, here’s a brief technical note on what this process does, and why it works.
When the Virtual Memory is reset, as described in this procedure, that drive space is first erased, and then a new, clean space is created. This new space does not have the problems the old space had. The result is Windows runs much better, because it doesn’t have to spend all of its time figuring out what’s in that drive space.


2 Comments