
Step by Step Configure Squid Proxy In Pfsense
Squid is a caching and forwarding HTTP Web Proxy and its supporting HTTP, HTTPS, FTP, and more. its also It reduces bandwidth and improves response times by caching and reusing frequently-requested web pages. It has a wide variety of uses, including speeding up a web server by caching repeated requests, caching web, DNS and other computer network lookups for a group of people sharing network resources, and aiding security by filtering traffic.
In this artical we know how install and setup Squid proxy on Pfsense. if you need to install using the following steps.
Install Squid Package on Pfsense
1. Login if Pfsense with User Name and Password.
2. Navigate to System and click on Package Manager.

3. Once Package manager opens, click on Available Package and type Squid in the Search bar.
4. Now click on Search button for the squid package.
5. Once Squid related package show in package, Select Squid and click on Install after that click on confirm the installation.
6. Once Squid Installation completed, Now Navigate to Service and click on Squid Proxy Server.

7. Here Local cache has to be done before configuring squid. for Local cache configuration click on Local Cache Tab.
8. Go to Squid Hard Disk Cache Settings. Here we are only change the disk size and Leave the others settings default. you can put the size of cache as you requirement. Now click on Save. The default Hard Disk Cache Location in Pfsense is /var/squid/cache.

9. Once Local Cache Setting Done. Now click on General Tab for Enable Squid Proxy Server.
10. Under Squid General Settings section Check the box of Enable Squid Proxy. Choose the interface for Proxy Server which port on Proxy Working Here we are selected Lan Port. Set the Proxy Port the default port of Proxy server is 3128. You can change if you want to another port. Now check the box of Allow Users ON interface (If checked, the users connected to the interface selected in the 'Proxy interface field will be allowed to use the proxy) the same subnets as the Proxy LAN interface selected automatic access without the need for creating an allow Access Control List.

11. Now Configure Squid Proxy Logging Settings. Check the box of Enable Access Logging. Path of logs file /Var/Squid/logs. The default log Rotation is disabled if left empty you can able to set the days as your requirement.


14. Under Squid Allowed Ports The following default port already allowed, 21 70 80 210 280 443 488 563 591 631 777 901 1025-65535. If you to allow another you can do from here.

15. Under Squid Advanced Filtering You can apply policy on YouTube Restrictions As per your requrement and click on Save.


17. Under Edit Firewall Rule Select Action Pass, Interface Lan, Address Family IPV4 and Protocol TCP/UDP.

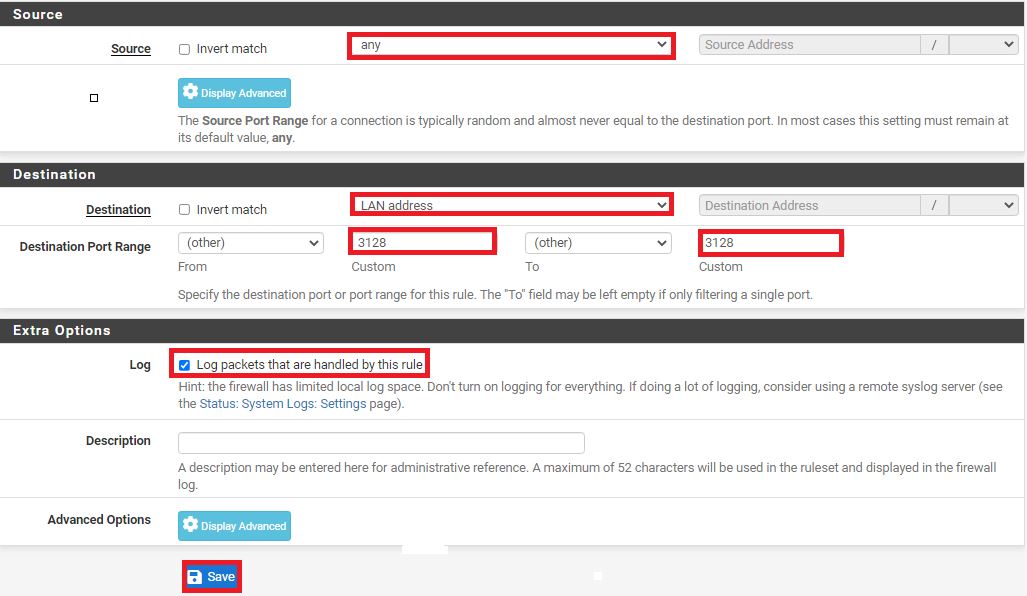
18. Under Source Select Any. Under Destination Select Lan Address (192.168.0.1). Under Destinations Port Range that you configure in proxy server (3128). Under Extra Options Check the Log box (Log packets that are handled by this rule). In Description type Description (Allow Proxy Server Port) And click on Save.


0 Comments