
Domain name system(DNS) is used for resolve hostname to IP address and IP address to hostname. DNS work on port number 53 TCP/UDP.
There are two options for install and configure DNS on windows server 2019. the first option is PowerShell and second one is GUI. we are here first to install DNS here with GUI. before installation of DNS set static IP address on server Ethernet.
First, we have to install DNS server roles after we will configure.
1. Click on windows and select server manager.

2. Click on Add roles and Features.
 3. Click on Next.

4. check the box of Role-based or features- based installation and click on Next.

5. Click on Next.

6. Click on DNS server and select Add features.

7. Now DNS server Selected click on Next.

8. Click on Next.

9. Click on Next.

10. Check the box Restart the destination server automatically if required and click on yes.

11. Click on Install.

12. Now DNS server installation started.

13. Now DNS server Installation completed click on Close.

14. Click on Start and type Run under type dnsmgmt.msc and click on OK.

15. Now open DNS Manager.

16. Right-click on Forward lookup Zones and create a zone.

17. Create a Primary zone and click on Next.

18. Type here Zone name and click on Next.

19. Click on Next.

20. Select Allow both nonsecure and secure dynamic update and click on Next.

21. Zone creation completed now click on Finish.

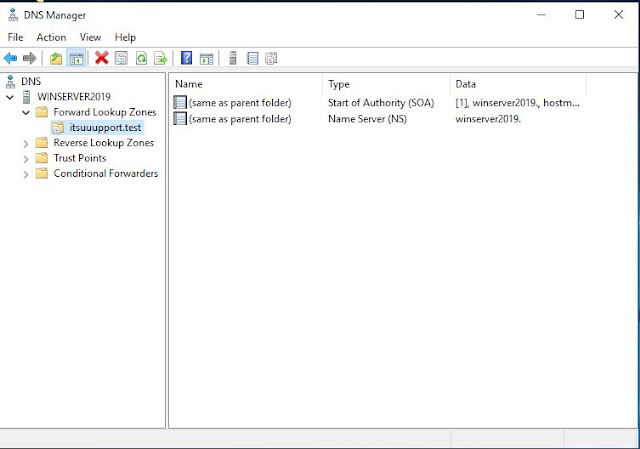
22. Expand Forward lookup Zone here a new zone created.
23. Right-click under itsuupport.test and create a host Record.

24. Under name Type your server hostname and under IP address type your server IP address.

25. check under Create associated pointer (PTR) record and Click on Add host.

26. Now host Record created.

27. Right-click on Reverse lookup Zone create a Zone.

28. Select Primary zone and click on Next.

29. I have selected IPv4 Reverse Lookup Zone because i have IPv4 IP address if you have IPv6 select IPv6 Reverse Lookup Zone.

30. Type here your IP address.

31. I have 192.168.0.* range IP address after type ip address click on Next.

32. Select Allow both nonsecure and secure dynamic update and click on Next.

33. Click on Finish.

34. Right-click under 0.168.192 and create a New Pointer.

35. Type server IP address under Host IP Address and server FQDN under hostname.

36. Click on OK.

37. Now open the command prompt and type command nslookup.

There are two options for install and configure DNS on windows server 2019. the first option is PowerShell and second one is GUI. we are here first to install DNS here with GUI. before installation of DNS set static IP address on server Ethernet.
First, we have to install DNS server roles after we will configure.
1. Click on windows and select server manager.
2. Click on Add roles and Features.


4. check the box of Role-based or features- based installation and click on Next.

5. Click on Next.

6. Click on DNS server and select Add features.

7. Now DNS server Selected click on Next.

8. Click on Next.

9. Click on Next.

10. Check the box Restart the destination server automatically if required and click on yes.

11. Click on Install.

12. Now DNS server installation started.

13. Now DNS server Installation completed click on Close.

14. Click on Start and type Run under type dnsmgmt.msc and click on OK.

15. Now open DNS Manager.

16. Right-click on Forward lookup Zones and create a zone.


18. Type here Zone name and click on Next.

19. Click on Next.

20. Select Allow both nonsecure and secure dynamic update and click on Next.

21. Zone creation completed now click on Finish.

22. Expand Forward lookup Zone here a new zone created.

23. Right-click under itsuupport.test and create a host Record.

24. Under name Type your server hostname and under IP address type your server IP address.

25. check under Create associated pointer (PTR) record and Click on Add host.

26. Now host Record created.

27. Right-click on Reverse lookup Zone create a Zone.

28. Select Primary zone and click on Next.

29. I have selected IPv4 Reverse Lookup Zone because i have IPv4 IP address if you have IPv6 select IPv6 Reverse Lookup Zone.

30. Type here your IP address.

31. I have 192.168.0.* range IP address after type ip address click on Next.

32. Select Allow both nonsecure and secure dynamic update and click on Next.

33. Click on Finish.

34. Right-click under 0.168.192 and create a New Pointer.

35. Type server IP address under Host IP Address and server FQDN under hostname.

36. Click on OK.

37. Now open the command prompt and type command nslookup.


0 Comments